
In the previous tutorial we have seen that in multiple <div>'s we have used the same values in the style attribute.
Don't remember? Let's do a recap.
<html>
	<body>
		<div style = "width:40%;display:inline-block">
			<img src="image1.jpg" style = "width:100%">
        </div>
		<div style = "width:40%;display:inline-block">
			<img src="image2.jpg" style = "width:100%">
        </div>
	</body>
</html>
In the above example the style attribute of the <div> elements has the same values. i.e. The first <div> has the value width:40%;display:inline-block.
<div style = "width:40%;display:inline-block">
	<img src="image1.jpg" style = "width:100%">
</div>
The second <div> also has the value width:40%;display:inline-block.
<div style = "width:40%;display:inline-block">
	<img src="image2.jpg" style = "width:100%">
</div>
So, don't you think we are using the same values in several places?
And to get rid of this HTML provides with an attribute called as class. Let us rewrite the same example using the class attribute.
<html>
	<head>
		<style>
			.myClass {
				width:40%;
				display:inline-block;
			}
		</style>
	</head>
	<body>
		<div class = "myClass">
			<img src="image1.jpg" style = "width:100%">
        </div>
		<div class = "myClass">
			<img src="image2.jpg" style = "width:100%">
        </div>
	</body>
</html>
So, in the above example we have followed a set of tasks to use the class attribute. Let us see them below :

<head>
	...
</head>
<head>
	<style>
		...
	</style>
</head>
<head>
	<style>
		.myClass {
			width:40%;
			display:inline-block;
		}
	</style>
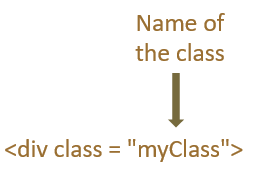
</head>In simple words, we give a name to the class attribute(myClass in this case).
<div class = "myClass">
And define the values of the class inside the <style> attribute.
<style>
	.myClass {
		width:40%;
		display:inline-block;
	}
</style>
The class is created using a dot (i.e. .) followed by the class name (i.e. .myClass). Post which you can define the values inside the braces(i.e. {}).
.myClass {
	width:40%;
	display:inline-block;
}
Now, let us say you want to take the values from two classes. And HTML gives us the flexibility to do that as well.
<html>
	<head>
		<style>
			.myFirstClass {
                border-style: dotted;
                border-width: 5px;
			}

			.myCustomColorRedClass {
				color: red;
			}

            .myCustomColorGreenClass {
				color: green;
			}
		</style>
	</head>
	<body>
		<div class = "myFirstClass myCustomColorRedClass">
			<img src="image1.jpg" style = "width:100%">
        </div>
		<div class = "myFirstClass myCustomColorGreenClass">
			<img src="image2.jpg" style = "width:100%">
        </div>
	</body>
</html>
So, in the above example we have used three classes, myFirstClass, myCustomColorRedClass and myCustomColorGreenClass.
<style>
	.myFirstClass {
		border-style: dotted;
		border-width: 5px;
	}

	.myCustomColorRedClass {
		color: red;
	}

	.myCustomColorGreenClass {
		color: green;
	}
</style>
In the first class (i.e. myFirstClass) we have specified the properties of the border that needs to be wrapped around the image.
.myFirstClass {
	border-style: dotted;
	border-width: 5px;
}
Then we have specified the color red and 'green' in the second(i.e. myCustomColorRedClass) and third class(i.e. myCustomColorGreenClass).
.myCustomColorRedClass {
	color: red;
}

.myCustomColorGreenClass {
	color: green;
}
Now, in the <div> element we have specified two class names(i.e. myFirstClass & myCustomColorRedClass).
<div class = "myFirstClass myCustomColorRedClass">
	<img src="image1.jpg" style = "width:100%">
</div>
And the values are taken from both the classes.
.myFirstClass {
	border-style: dotted;
	border-width: 5px;
}
And
.myCustomColorRedClass {
	color: red;
}
And the same thing we have followed for the next <div> element.
<div class = "myFirstClass myCustomColorGreenClass">
	<img src="image2.jpg" style = "width:100%">
</div>
You can declare a class.
.myFirstClass {
	border-style: dotted;
	border-width: 5px;
}
And it can be used by different HTML elements.
Let us see in the below example :
<html>
	<head>
		<style>
			.myFirstClass {
                border-style: dotted;
                border-width: 5px;
			}
		</style>
	</head>
	<body>
		<div class = "myFirstClass">
			<img src="image1.jpg" style = "width:100%">
        </div>
		<p class = "myFirstClass">
			<img src="image2.jpg" style = "width:100%">
        </p>
	</body>
</html>
So, in the above example we have defined an HTML class named myFirstClass,
<style>
	.myFirstClass {
	border-style: dotted;
	border-width: 5px;
	}
</style>
And used the above class with a <div> element,
<div class = "myFirstClass">
	<img src="image1.jpg" style = "width:100%">
</div>
And a <p> element,
<p class = "myFirstClass">
	<img src="image2.jpg" style = "width:100%">
</p>
So, a class can be declared once and used by multiple elements.